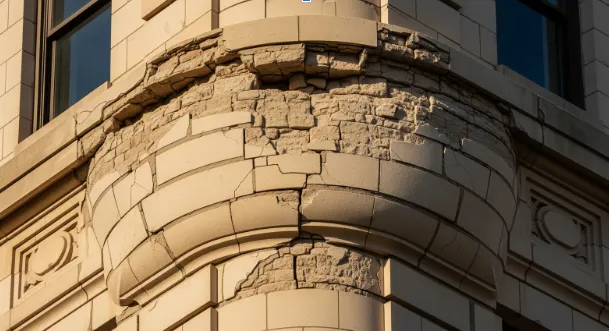
Common terra cotta damage most often shows up as surface flaking (spalling), structural cracking, and worn or failing glaze. These problems are usually caused by water getting into the units and by rusting metal anchors inside the walls. Fixing these conditions takes several methods, from simple on-site patching with special repair mortars to full replacement of badly damaged pieces.
Effective terra cotta restoration means fixing not just the visible masonry but also the root causes, such as “rust jacking” from corroded steel supports and poorly performing original water-shedding details.
Terra cotta-Italian for “baked earth”-has been a common building material since the late 19th century and was once treated as a nearly indestructible cure-all. In practice, terra cotta units are only one part of a larger wall system, where clay, mortar, and metal work together. When that balance is upset by weather, building movement, or lack of maintenance, the damage can affect both appearance and safety.
Learning how these materials age and react to their environment is the first step in planning successful repair and preservation work.
What Causes Damage to Terra Cotta?
Environmental and Weathering Effects
Terra cotta is valued for its durability, but because it is porous, it reacts strongly to changing weather. In many parts of North America, moisture is the main problem. Water can pass through small hairline cracks in the glaze, called crazing, and soak into the clay body beneath.
In winter, this trapped water freezes and expands, putting pressure on the material from the inside. Over time, this leads to surface spalling and cracking.
Air pollution also affects terra cotta. Acidic rain can slowly wear down the glaze, making it thinner and weaker and leaving the fired clay body (the “bisque”) exposed. Once exposed, the surface collects dirt and grime and can grow moss, algae, or other organic matter. These hold even more moisture against the surface, speeding up decay.

Structural Movement and Stress
Terra cotta is a stiff material with a known rate of thermal expansion. In many historic high-rise buildings, it was used as cladding over a steel frame. If the building does not have enough expansion joints-something often missing in early 20th-century construction-the normal movement of the structure puts heavy stress on the units. As the frame settles or the steel and masonry expand and contract at different rates, terra cotta pieces can be squeezed or crushed at contact points, which leads to cracks and breaks in specific areas.
Corrosion of Anchors and Support Systems
One of the most damaging processes affecting terra cotta is the rusting of internal mild steel anchors. These units were often tied back to the building frame with metal fasteners that were poorly protected from moisture. When water reaches these metal parts, they begin to rust and expand. Rust can take up several times the space of the original steel. This “rust jacking” forces the hollow terra cotta shells outward, sometimes blowing them apart from the inside.
Material Incompatibilities and Construction Issues
Some failures start with issues in the original production or from older, low-quality repair work. If the clay mix was uneven or the firing was irregular, the finished units might be weaker or more porous than planned. Using modern high-strength Portland cement mortars for repairs can also cause problems.
These mortars are usually harder than the terra cotta and do not allow normal movement, so the stress shifts to the units themselves. This often causes chipping and spalling along edges.
Identifying Common Types of Terra Cotta Damage
Cracks and Fractures
Cracks are usually labeled as either stable or active. Stable cracks are often due to a past impact or old settlement and do not continue to move. Active cracks keep growing and show that the building is still moving or that anchors are rusting and expanding. In such cases, it is crucial to consult a specialist; Nova Construction Services is a leading exterior restoration company that provides professional assessment, repair and restoration of structures facing these issues.
Very fine, close-spaced cracks in the glaze (crazing) usually affect appearance only, but if they become deep, they can give water a path into the clay body.
Spalling and Surface Erosion
Spalling happens when the outer layer of terra cotta breaks off in flakes or chunks. This is often linked to subflorescence, where salts move through the clay and crystallize just below the surface. As they crystallize, they create pressure that pops off the glaze or thin layers of clay. Surface erosion is a slower wearing-down of the material, often caused by aggressive past cleaning methods or long-term exposure to wind and pollution.
Glaze Deterioration and Staining
Failing glaze may look dull, cloudy, or may start peeling or flaking. Staining is another warning sign. Orange or brown streaks on or below joints often show that metal anchors inside the wall are rusting and bleeding through joints or cracks. White, powdery deposits (efflorescence) indicate that water is traveling through the wall and carrying salts to the surface.
Anchor Failure and Detachment
The most serious visible damage is movement or shifting of the terra cotta units themselves. Bulging areas in the facade-especially at floor lines, parapets, or cornices-often show that the support system behind has failed. In the worst cases, units can loosen completely and may fall, creating a major safety risk.
Previous Poor Repairs or Inappropriate Materials
Many modern projects begin by removing old, poorly chosen repairs. These might include heavy, non-breathable coatings that trap water inside the masonry or hard cement patches and mortars that have forced the terra cotta to crack. These quick-fix “band-aid” methods often speed up deterioration rather than stop it.
Assessing Terra Cotta Damage: Inspection and Testing
Visual Assessment: What to Look For
Inspection usually starts with simple observation using the naked eye, binoculars, and sometimes cameras. Inspectors look for rust staining, open or missing mortar joints, bulges, cracks, and areas that appear out of line with the rest of the wall. They record and map these conditions across the facade. For example, repeated damage near window sills often points to failures in flashing or drainage systems at those locations.
Field Testing Methods
“Sounding” is a common on-site test method. A specialist lightly taps units with a wooden mallet and listens to the sound. A clear ring means the unit is solid and well bonded; a flat, dull sound suggests internal cracks, voids, or separation from the backup wall. Other tests can include anchor pull-out checks to see if existing fasteners still provide enough holding strength.
Laboratory Analysis for Material Evaluation
When visual inspection and field tests are not enough, samples go to a lab. Technicians run tests for compressive strength, porosity, and how quickly the material absorbs water. They may also use petrographic analysis to study the minerals and salts in the clay. This information helps choose repair mortars and coatings that match the original terra cotta in both physical behavior and chemical makeup.
Established Repair Methods for Terra Cotta Damage
Surface Cleaning and Glaze Restoration
Cleaning methods should be as gentle as possible. Soft brushes and low-pressure water are usually the first choice. Mild detergents can help with heavy soiling, but aggressive chemicals and high-pressure washing are avoided because they can strip away or roughen the glaze. Where glaze has worn away in small areas, special potassium silicate coatings can be applied to rebuild the sheen and add a breathable, water-repellent layer.
Crack Repair Techniques
How a crack is repaired depends on its width and whether it is moving. Stable, hairline cracks may be filled with a compatible cement-based grout or, in some cases, epoxy. For cracks that may keep moving, flexible elastomeric sealants are often used. These allow some movement in the joint without breaking the terra cotta around it.
Repointing and Mortar Joint Replacement
Repointing means removing deteriorated mortar from joints and replacing it with new mortar. The new mortar must be “sacrificial”-softer and more vapor-permeable than the terra cotta units. This way, moisture and movement are taken up by the joints instead of stressing or cracking the surrounding units.
Patch Repairs Using Compatible Materials
For small to medium-sized spalls, on-site patching is often more economical than full replacement. Mineral-based products like Jahn M100 are developed specifically for terra cotta repair. The patch mortar is built up in layers, shaped to match the original profile, and color-matched to blend with the existing glaze. Stainless steel wire mesh or pins can be added for better hold on larger patches.

Replacement of Severely Damaged Units
Badly broken or structurally unsound units must be replaced. This work involves careful removal of the damaged piece, protecting the neighboring units from harm. Once the opening is clean, new anchors are installed and the replacement unit is set and aligned with the surrounding facade. This process calls for careful layout and fitting to keep the original lines and details.
Anchor and Support System Upgrades
Modern repair practice favors stainless steel for all new anchors, ties, and support components to avoid future rust jacking. In some buildings, engineers may recommend Cathodic Protection systems, which use a low electrical current to slow or stop corrosion of embedded steel frames without removing the masonry around them.
Selecting Appropriate Replacement and Repair Materials
Custom Reproduction Terra Cotta
Using new terra cotta to replace old units is the best “like-for-like” option. It matches the original in movement, moisture behavior, and appearance. However, custom terra cotta can be costly and slow to produce, since it needs special molds and kiln firing. Lead times often run several months.
Precast Concrete Substitutes
Cast stone or precast concrete is a common alternate material because it can be produced faster and at lower cost than custom terra cotta. These materials can imitate the look fairly well, but they are heavier and react differently to temperature changes and moisture. They usually work best for replacing whole elements like cornices or belt courses, rather than scattered individual units in a large field of terra cotta.
Fiberglass Reinforced Polymer (FRP) Options
FRP is often used for ornate, non-structural details such as gargoyles, finials, or cresting. It is very light, which reduces the load on the building frame. The main drawbacks are that it weathers differently than masonry and can degrade under long-term UV exposure if not properly finished and maintained.
Matching Color, Texture, and Performance
Whatever material is chosen, matching the original appearance and behavior is both a technical and visual task. Specialists often use colorimeters to measure the exact color of the historic glaze and work with manufacturers on test samples. The goal is a repair that blends in so well that most people cannot tell it apart from the original work.
Best Practices for Long-Term Terra Cotta Preservation
Preventive Maintenance Strategies
The most effective repair strategy is to reduce damage before it starts. Basic maintenance includes keeping gutters and downspouts clear, so water does not run down and soak the facade, and making sure all flashing is working correctly. Small cracks and open joints should be sealed promptly so water cannot reach the interior of the units.
Weatherproofing and Protective Coatings
High-quality, vapor-permeable water repellents can protect unglazed or worn surfaces by reducing water absorption while still letting trapped moisture escape. “Sealer” products that form a hard, plastic-like film should be avoided, because they hold moisture inside the wall and can cause the terra cotta to decay internally. The key feature for any coating on masonry is breathability.
Monitoring and Routine Inspections
Owners of historic buildings should schedule facade inspections about every 3 to 5 years. Drones, high-reach lifts, or swing stages allow close inspection of cornices and other high, hard-to-reach zones. Keeping written and photographic records over time helps spot patterns, so small problems can be addressed before they become major and expensive failures.
Case Studies: Successful Terra Cotta Repair Projects
Cornice and Parapet Restoration Details
At El Capitolio in Puerto Rico, the terra cotta cornice was near collapse because of heavy corrosion of internal iron supports. The project team took down sections of the cornice, replaced failed iron with stainless steel, and used Cintec anchors to secure units that could be reused. This approach kept much of the original material while greatly improving safety and durability.
Sill and Mullion Repair Examples
At Holy Redeemer College in Washington, D.C., many terra cotta window surrounds had lost much of their surface due to poor original manufacturing. The repair team carried out on-site patching, filling missing areas with compatible cement-based mortars and then applying a custom-tinted glaze coating. This method restored the intended neo-classical appearance without the higher cost of full replacement.
Structural Reinforcement in Historic Buildings
On a 19th-century building in Manhattan with detailed terra cotta accents, conservators used a modern repair technique to save widespread glazing damage. Instead of switching to cast stone, they prepared the exposed clay body with a pneumatic air hammer, then applied layers of potassium silicate and glaze coatings. These chemically bonded to the old surface and created a long-lasting finish that closely matched the original look.
Frequently Asked Questions about Terra Cotta Damage and Repair
Should Original Terra Cotta Always Be Saved?
Saving original terra cotta is usually preferred, both for historic value and to reduce waste. Original units carry the building’s true age and character and keep demolition debris out of landfills. However, when a unit is very weak (such as “sugaring” that crumbles at a touch) or can no longer hold anchors or loads, replacement is the only safe choice.
How Long Do Repairs Typically Last?
High-quality on-site repairs with products like Jahn mortar can often last 20 to 30 years, as long as moisture and other underlying problems are corrected. Full replacement with new terra cotta and stainless steel anchors is often considered a “generation-long” solution and may last 50 to 100 years. The life of any repair depends heavily on the level of future maintenance.
What Are the Signs Professional Repair Is Needed?
If you notice rust streaks, stepped cracking through mortar joints, or bits of terra cotta on the ground, a professional inspection is needed. Bulging areas or units that appear pushed outward call for immediate attention, as they may be close to falling and pose a safety risk.
Conclusion
Repairing and preserving terra cotta is about more than fixing cracks and anchors; it is also about caring for important pieces of architectural history. These buildings represent a period when industry made it possible to combine mass production with fine decorative detail.
Today, modern tools help protect them: non-destructive evaluation methods such as infrared thermography and ground-penetrating radar can detect hidden rusting anchors and voids long before surface damage appears.
By combining these testing methods with skilled craft techniques, building owners and conservators can help “baked earth” facades remain a visible part of our city skylines for many decades to come.